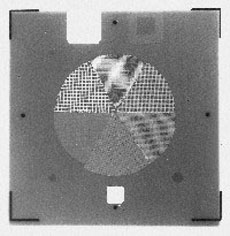
Radiography/Fluoroscopy Quality Control Phantom 07-647
For fine-tuning of radiographic and fluoroscopic imaging systems
The R/F QC Phantom is designed to provide the diagnostic radiologic technologist with an accurate, easy-to-use tool for evaluating the image quality and performance of standard diagnostic radiographic and fluoroscopic imaging systems.
For fine-tuning of radiographic and fluoroscopic imaging systems, it is recommended that the phantom be imaged at least monthly on all radiographic and fluoroscopic equipment. To attain the most accurate, up-to-date quality control information, a daily or weekly frequency is preferable. When used daily, the R/F QC Phantom will allow the technologist to quickly determine whether the equipment is functioning correctly.
This easy-to-use phantom allows the user to complete the suggested protocol in approximately 5 minutes or less, when used on a standard R/F system. Once the phantom is imaged, simply graph the results to determine any trends that may indicate a degradation of imaging system performance, such as a steady but slow change in the fluoro kVp or in the radiographic mAs.
Key Features- At the center of the phantom are pie shaped wedges of varying mesh sizes: 20#, 30#, 40#, 60#, 80#, and 100# L/in, for evaluating high-contrast performance
- Surrounding the mesh are four low contrast "masses" of different diameters: 2, 4, 6, and 8 mm
- At one edge of the phantom is a small "density difference" patch, for a measure of contrast on the films
- At the opposite edge of the phantom are two monitor adjustment squares, each having a low contrast square insert
- The phantom contains a 2 mm copper attenuator, which allows it to simulate the attenuation of an average adult
- At the corners of the test tool are lines for aligning the light field
- QC charts are provided for plotting both the radiographic and fluoroscopic results
- Along the sides of the test tool are beads 1 cm inside and outside of the lines started in the corners
- Designed specifically with the radiologic technologist in mind
- Provides an accurate overall evaluation of image quality consistency
- For QC of phototimer and automatic brightness control consistency
- Ideal for use in determining subtle degradation in imaging performance
- Average test time is less than 5 minutes per unit
- For use with radiography, fluoroscopy, and spot films, too
- Verifies fluoroscopic monitor contrast and brightness adjustment
- Dimensions: 7 x 7 x 0.56 in (t) (17.78 x 17.78 x 1.42 cm)
- Weight: 2.5 lb (1.13 kg)

Light field collimated to alignment markers on the test tool. This image
shows excellent correspondence between the x-ray field and the light field.


